Last month I had a very good discussion with one of members at
mattepaingt.org regarding the topic of painting with
HDR images in Photoshop. Since there ain't much information available on this issue in the Internet I thought its worth a post here.
Even though you may not come across this issue everyday but still always good to know your way out if faced with in any situation. Let's say you have a close up of a snowcapped mountain with a strong glow (super whites) on the snow and it is series of shot you got from the production in 10 bit log format. Since there are multiple matte painters or vendors working on these series of shots, it would a make lot of sense if all super whites goes the same way as it came from the film scanner to the
DI department in all of these shots without causing any mismatch.
At the moment most of the Photoshop's filters nor tools doesn't support 32 bit depth so that leaves us with best option of working in 16 bit to keep the extra information in your highlights (superwhites). You could also paint in Log but that is a pretty hack by itself and also blending modes or transparencies may give you weird results since all of them are designed to work in linear or
gamma corrected images.
Following are two ways you could approach this issue.
i) Painting on Gamma remapped 16 bit Linear plates. (Thanks to
Jbills for this one)
I find this method very logical and doable once you get the hack of it. You start with finding the brightest pixel in your film scan / image in your comp app (Nuke, Curvetool node) and then remap (Nuke, Grade node) your white point to the same. This will obviously darken your image and you save out 16 bit file out of your comp app for matte painting.
In Photoshop you apply an adjustment layer with the inverse of the darkening you have done in your comp app. Which can be calculated by division of 1 by your brightest pixel value and later inversing resulted value. You can now apply adjustment layer with this value to expand tonal range back to normal for matte painting. Once matte painting is finished the file is exported back to comp app in 16 bit image where you now apply directly apply the vale you got while diving 1 by your super white pixel value. Thus saving your super whites!
To quote
jbills from the thread
So we simply compress the above and below float information and remap to 0-1. then, in photoshop (16 bit) I'll add an adjustment layer and remap the white point to .7, for example, to expand these values back out. Matte painter works with that turned on but exports without it and we invert the compression in nuke. pretty simple.
At first it may not sound as easy it does especially if you are new to these terminologies so I strongly suggest you to go through
this thread again and try this workflow by yourself to have a clear understanding.
ii) Painting on 32 bit log plates.
Painting on the Log space is most accurate solution as far keeping all the information same as the input but as I mentioned before most of Photoshop tools and operations are not geared towards Log space. Also do keep in mind when you open a .dpx file Photoshop it opens it up as 16 bit gamma corrected file, that is by defualt sRGB. In order to take get full range of your Log space you must convert it to 32 bit Linear but before doing so you must change your color profile from sRGB to a custom Linear profile. Otherwise Photoshop will assume the file is already gamma corrected and will linearize the image causing a shift in the pixels values while bit depth conversation.
Do check out this
great blog post by Brendan from fnord software on this issue. Also keep in mind that you can always turn on your proof setup to monitor Gamma in Photoshop to view your file in display Gamma of your monitor irrespective gamma correction of your file (more like viewer Gamma in Nuke). In this case our washed out Log file will look more like sRGB for viewing sake while working on the matte painting.
Advantage of working in 16 bit Linear space.
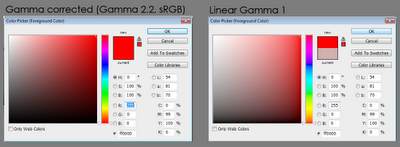
Adopting a 16 bit Linear workflow may not really save all of those super whites information but still has notable advantages over default 8 bit sRGB workflow. The 16 bit offers more color precision, accurate composite and blending operations to name a few. There are plenty more tonal range available in Linear mode and it is very evident if you compare the colors in color picker box in both modes. From the below image it is obvious that how much more tints and shades we are getting in the Linear mode and there is will be noticeable change when you work with Levels or Curves considering the more range you have.
One thing to keep in mind though, while exporting to your 16 bit Linear matte painting you want to make sure that your comp app recognize it as Linear not as sRGB and do not add any additional gamma correction to linearize image since it is already in linear color space.
For this workflow you may still need to use the proof setup option available in view menu to view your linear images as gamma corrected ones. Also here is a link to download
fnord Cineon Converter for Photoshop which does standard Kodak Log2Lin conversation.
Download Cineon Converter (
WIN,
MAC)
All this will be a thing of past only if Adobe build a robust workflow based on 32 bit Linear float that is similar to
Nuke. Until then it will be always a hack to manage color especially with the film plates or HDR images in Photoshop.
Here are couple of cool links for further reading and you could find a lot more if you Google for one of the most
mysterious word in CG industry!


