Sunday, March 6, 2011

Matte Painting with Superwhites in Photoshop

Last month I had a very good discussion with one of members at mattepaingt.org regarding the topic of painting with HDR images in Photoshop. Since there ain't much information available on this issue in the Internet I thought its worth a post here.

Even though you may not come across this issue everyday but still always good to know your way out if faced with in any situation. Let's say you have a close up of a snowcapped mountain with a strong glow (super whites) on the snow and it is series of shot you got from the production in 10 bit log format. Since there are multiple matte painters or vendors working on these series of shots, it would a make lot of sense if all super whites goes the same way as it came from the film scanner to the DI department in all of these shots without causing any mismatch.

At the moment most of the Photoshop's filters nor tools doesn't support 32 bit depth so that leaves us with best option of working in 16 bit to keep the extra information in your highlights (superwhites). You could also paint in Log but that is a pretty hack by itself and also blending modes or transparencies may give you weird results since all of them are designed to work in linear or gamma corrected images.

Following are two ways you could approach this issue.

i) Painting on Gamma remapped 16 bit Linear plates. (Thanks to Jbills for this one)

I find this method very logical and doable once you get the hack of it. You start with finding the brightest pixel in your film scan / image in your comp app (Nuke, Curvetool node) and then remap (Nuke, Grade node) your white point to the same. This will obviously darken your image and you save out 16 bit file out of your comp app for matte painting.

In Photoshop you apply an adjustment layer with the inverse of the darkening you have done in your comp app. Which can be calculated by division of 1 by your brightest pixel value and later inversing resulted value. You can now apply adjustment layer with this value to expand tonal range back to normal for matte painting. Once matte painting is finished the file is exported back to comp app in 16 bit image where you now apply directly apply the vale you got while diving 1 by your super white pixel value. Thus saving your super whites!

To quote jbills from the thread

So we simply compress the above and below float information and remap to 0-1. then, in photoshop (16 bit) I'll add an adjustment layer and remap the white point to .7, for example, to expand these values back out. Matte painter works with that turned on but exports without it and we invert the compression in nuke. pretty simple.

At first it may not sound as easy it does especially if you are new to these terminologies so I strongly suggest you to go through this thread again and try this workflow by yourself to have a clear understanding.

ii) Painting on 32 bit log plates.

Painting on the Log space is most accurate solution as far keeping all the information same as the input but as I mentioned before most of Photoshop tools and operations are not geared towards Log space. Also do keep in mind when you open a .dpx file Photoshop it opens it up as 16 bit gamma corrected file, that is by defualt sRGB. In order to take get full range of your Log space you must convert it to 32 bit Linear but before doing so you must change your color profile from sRGB to a custom Linear profile. Otherwise Photoshop will assume the file is already gamma corrected and will linearize the image causing a shift in the pixels values while bit depth conversation.

Do check out this great blog post by Brendan from fnord software on this issue. Also keep in mind that you can always turn on your proof setup to monitor Gamma in Photoshop to view your file in display Gamma of your monitor irrespective gamma correction of your file (more like viewer Gamma in Nuke). In this case our washed out Log file will look more like sRGB for viewing sake while working on the matte painting.


Advantage of working in 16 bit Linear space.

Adopting a 16 bit Linear workflow may not really save all of those super whites information but still has notable advantages over default 8 bit sRGB workflow. The 16 bit offers more color precision, accurate composite and blending operations to name a few. There are plenty more tonal range available in Linear mode and it is very evident if you compare the colors in color picker box in both modes. From the below image it is obvious that how much more tints and shades we are getting in the Linear mode and there is will be noticeable change when you work with Levels or Curves considering the more range you have.
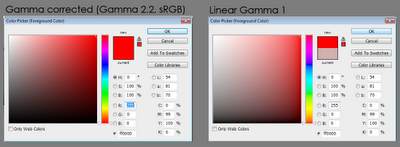
One thing to keep in mind though, while exporting to your 16 bit Linear matte painting you want to make sure that your comp app recognize it as Linear not as sRGB and do not add any additional gamma correction to linearize image since it is already in linear color space.

For this workflow you may still need to use the proof setup option available in view menu to view your linear images as gamma corrected ones. Also here is a link to download fnord Cineon Converter for Photoshop which does standard Kodak Log2Lin conversation.

Download Cineon Converter (WIN, MAC)


All this will be a thing of past only if Adobe build a robust workflow based on 32 bit Linear float that is similar to Nuke. Until then it will be always a hack to manage color especially with the film plates or HDR images in Photoshop.

Here are couple of cool links for further reading and you could find a lot more if you Google for one of the most mysterious word in CG industry!


Thursday, February 10, 2011

My favorite top 10 TED talks

I been watching TED talks ever since it went public on internet. Since I subscribe to their monthly newsletter I haven't really missed any of the popular talks. TED talks have been really inspiring and had a great influence on my life. Though I have constantly posted some of the talks in my blog but there are few talks which always come to my mind when I think about TED and following are some of those talks I would rate it as my favorites.


and this one is my most favorite!

Friday, January 7, 2011

Ken Robinson: Changing education paradigms

Sir Ken Robinson's talk never ceases to amaze me and I think he is absolutely right! We need a paradigm shift in our education system to change the way we think, work and live. Until then most of us will be stuck within our iterating factory line systems and unaesthetic minds.

Thursday, December 2, 2010

VFX pipeline notes


I was responsible for a pipeline research back at my previous workplace and here are some of the general insights I had from my research. There are some good resources out there on web when it comes to pipeline and there is this really great blog called 'The Art of CG Supervision', by Isa Alsup. Especially check out this collection of articles on studio pipeline on his blog, Pipeline Articles.

In the preliminary research itself I realized that everybody tends to think they have a pipeline but in reality they mix up their workflow with their pipeline. It is very important to note that pipeline is structural process of the whole project while workflow is the step by step process an artist undertakes to complete a particular task and pipeline often divides workflow into more meaningful sections using dataflows.

The term 'pipeline' is a computing term and the term was invented by Douglas McIlroy, one of the designers of the first Unix shells. According to Wikipedia, 'a pipeline is a set of data processing elements connected in series, so that the output of one element is the input of the next one.' This concept transcends well into the whole spectrum of visual effects production where there is always one shot completed by more than one artist or department.

A visual effects pipeline usually comprise of three elements and they are chiefly, Production, Data and Approval. One could also look at these three elements from a managerial perspective and then it could be divided into Technical Management, Information Management and Creative Management. The pipeline can be consists of diverse components and according Alsup, it mainly comprise of people, technology, methods and leadership. It is crucial to note that a digital asset management system is not a pipeline but it is only a dataflow centric element of an effective pipeline.

A effective pipeline is derived by nature of work, resources and the company ideology. The nature of the pipeline can be data centric or artist centric or even technique centric but according to Mayur Patel, author of the book 'The Digital Visual Effects Studio', an artist centric pipeline would be more effective because it gives more importance to the work artists perform rather than the data they generate and this sort of pipeline also tries to provides the artists optimum conidtions to unleash their creativity.

I think it could be questionable that why one should complicate the concept of an artist workflow and asset management system into such a management jargon. Moreover adopting such a system would add more managerial costs to the organisation. But an effective studio pipeline is targeted at long term goals such as streamlining diverse projects, quality control and interactivity at different stages, estimating project overhead, facilitating employment of certain technology or methods and embracing company culture in the process.

I think if you consider the above factors then you can look at the pipeline as a production facilitating element which directly relates to the profit motives of the business and you use it with control and style.

Following are list of resources on pipeline

Sunday, October 31, 2010

Render farm notes

This post is mainly for folks who wonder about how a basic render farm setup works in a animation or visual effects production pipeline. This is nowhere near a technically accurate post since most of it is took from my own personal research on setting up a render farm back at my previous workplace.

Most of render farm uses parallel rendering or distributed rendering for complex or huge amount rendering in the production. The distributed rendering basically breaks up the image sequence into chunks of individual frames and spreads it across the render machines for faster processing.

A very common way to go about distributed rendering is by server clustering, it is way of combining multiple computers or computer servers to perform a common task. There are different ways of clustering meant for different job types. Since our requirement is parallel rendering so the most effective way of clustering would be a parallel gird based cluster, in which dedicated master node (server) is the only computer which artist interact with to submit jobs. This machine then acts as the file server, render manager. This provides a single-system image to the user, who launches the jobs from the master node without ever logging into any worker nodes (other clustered computer under server).

There are quite a lot of render manager software available in the industry today which allows you to effectively set up a parallel cluster based render farm and following are to name a few, DrQueue, Qube, Royal Render, Deadline, Smedge, Muster etc.

Here is a basic flowchart depicting the setup I described above.
Also note that this setup is also commonly known as HPC (High performance computing) depending upon the scale of your farm. It is ironic the main advantage of this setup is not mainly speed, though it is considerably a large factor. But don't expect your frame to be rendered within a split second after your mouse click. It is rather an obnoxious process which will really require some good patience and technical expertise. Other main advantage would be the ability to queue the render jobs and this opens up lot of possibilities like for example, queuing multiple tests version for a shot for a overnight rendering thus increasing your productivity.

Cloud computing and GPU render farm bandwagon.

If you been researching on render farms lately then these are two terms which will hit you again and again and it is important not to get mixed up with both of these technologies since they are not really corresponding to each other.

Cloud computing is more a like remote service thorough web or virtual private networks (VPLAN) where you can use the service provider's hardware for your rendering purpose. And this it makes perfect sense to visual effects production houses who might need to increase the render farm capacity on a particular show's requirement. But acquiring , lodging and maintaining even a one single worker node in a render farm involves lot of costs even the after project is over so cloud render farm suits the industry needs.

Though it sounds like a cost effective scalable solution but comes with its on issues like security, availability of custom scripts, plugins or assets at service provider's site and also remote management of render farm may prone to more network issues.

To understand better the scope of cloud computing, take a look this presentation

GPU rendering on the other hand is going to bring a paradigm shift in the industry where it may to replace most of current CPU based render farms. This doesn't mean the end of CPU based render farms since there still areas (simulation, dynamics and AI) where CPU will perform better than GPU.


Here is snippet took from article called 'Are you ready for GPU revolution?" by Joe at renderstream
To help you understand how GPU acceleration could speed up rendering, lets think of it in terms of bucket rendering. (Please keep in mind this analogy isn’t technically accurate) Most of you are familiar with bucket rendering since modern renderers use that method. As a renderer calculates and ultimately draws pixels, it does so in small portions, or buckets, of a predetermined size. For every number of cores you have in your machine, you will have an equal amount of buckets at render time. For example, a common workstation today will have 4 cores (also known as a quad core) thus you will see 4 buckets at render time. If you have a dual quad core machine you will see 8 buckets and so on…
Today’s GPUs have 240 cores and the next generation will have up to 512 cores. By the time GPU acceleration is available for rendering, there could be even more cores available on the GPU. So, you can start to see how a GPU can have a tremendous impact on rendering. With CPUs we see a bucket work on a small portion of the rendered frame and then move on to another region. With a GPU, the available buckets would essentially fill the entire rendered frame. All portions of the frame would be “worked on” at once allowing for near real time rendering.
It also worth check this a great article on how GPU render helped spped up Avator production. As they described in the article GPU rendering will definitely bring a huge difference in productivity of the artists.

So as you can see I think in the future GPUs will be effectively integrated into current CPU based render farms and it will have huge impact on the render times and the way artists works.

Till then, happy rendering ;)


Monday, October 25, 2010

Porn drives technology and its goes stereoscopic!

They say porn industry drives technology and it didn't took much time for them to join the new millennium's stereoscopic 3D bandwagon. According to a guardin article, in nutshell here is what porn has done for media industry so far.

· Camcorder and VHS video machines were pioneered by porn barons anxious to find a cheap way to mass market blue movies. Take-up of DVD players was driven by pornographers and their customers because the technology enabled users to skip to and from their favourite scenes.

· Pay-per-view cable or satellite TV movies entered the market only after porn firms introduced 'premium' services in hotels and on digital networks. Interactive television, common on digital sport channels, was developed by pornographers to allow users to focus on favourite actors and actresses.

· Internet use and e-business have been driven by smut. There are 80,000 adult websites, which generate annual profits of more than £1 billion - more than any other e-commerce sector.


Thursday, October 21, 2010

Compositing showreel 2010

You may also download shot breakdown and I have also designed a single webpage placeholder for my reel, resume and shot breakdown, check it out!

I managed to finish this cut quite quickly in couple of days time, so I am pretty happy about how it turned out. I hope my next show reel will have more high end feature film compositing and matte painting shots.

Most of the work in this show reel was done during my time at apostrophe films. So I thank everyone over there especially my senior artist Faisal and other colleagues in VFX dept.